Traci Anello

The Power in Food


Leave a comment

Hosting an appetizer social

Tonight I was giving some thought to hosting an appetizer social.

The beauty of making appetizers is they are generally pretty quick to put together. You can make one specific base and then add different ingredients. This will accomplish two things. One, you will be able to make a fair amount at one time and two, you’ll save yourself from spending your rent money for the month.

One appetizer I find very simple is crostinis. Crostinis start with a baguette cut into thin slices (on the diagonal). Then they are brushed with olive oil and either grilled lightly or toasted in the oven. There’s your base. And you can get at least four dozen pieces per baguette.These can be made a few days ahead of time.

The best part about crostinis is what you put on them. The sky is the limit. Depending on whether or not your social has a theme will dictate the toppings. Here are a few examples: Honey goat cheese with caramelized onions, Cranberry walnut goat cheese with roast chicken, sun-dried tomato and basil with fresh mozzarella, curried chicken salad, fresh salsa with Monterey jack cheese, roast duck with lingonberry cream cheese and brie. Here are 6 examples. That’s six completely different apps. Do you just happen to have some soft-boiled quail eggs from dinner?? You never know? Add that with a fresh dill aioli. Simple appetizers that look expensive. Crostinis are also good for dips like spinach and artichoke.

I like to make chicken tender bite size pieces. This is probably going to be the best recipe I ever share. I swear I get more letters from this recipe and I really don’t get it. I can make swans out of sugar and cream puffs like the French but a simple chicken tender is the best requested recipe. All you have to do (and gluten-free friends, no one will ever know you’re serving GF) is take two gallon zip lock bags. Well, that’s not all you have to do. In one bag add 1/2 cup of mayonnaise, ranch dressing or even caesar dressing. In the other bag add 2 cups of panko style breadcrumbs (yes, even Gf breadcrumbs like Panebelle work the best), 1/4 cup Asiago cheese, salt pepper and I like to add a teaspoon of Cajun seasoning but that’s optional. Cut your chicken into bite size pieces and add to the mayo zip lock. Seal and toss to coat. Then in small batches, add to the breadcrumb bag and toss to coat. Place on a baking sheet lined with parchment paper and bake at 400° for about 10 to 15 minutes. That’s it!! Throw the bags away and easy cleanup too! I’m not Heloise but I will find a way to eliminate the dish step if I can. Remember the parchment blog?? Easy cleanup! Serve these with a ranch dressing, southwest style dipping sauce or even coat with a buffalo sauce. heck, do all three and combined with about appetizers, you have nine to choose from! And this party is just starting!

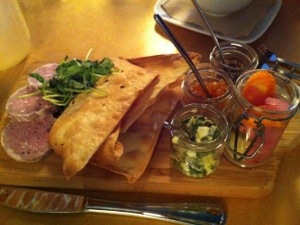
Here’s one that takes a little longer but let’s class it up a bit. You’ll need small wooden planks or boards. Four ounce canning jars (see the picture) will be perfect for adding condiments. You’ll also need small butter knives and those annoying little lobster picks with the tiny fork on the end. I say annoying because when I do the dishes, I stick myself every time but on a display like this, it looks nice and functions well. Now the fun part:

First you pick a main ingredient. It can be duck sausage, thinly sliced roast turkey, smoked salmon, italian sausages or even vegetarian with roast vegetables…whatever you have or want to use. Then you pick a nice homemade cracker or flatbread cracker but choose a good one. No place for Ritz here. Now the canning jars. It should complement what you have for the main ingredient. So the smoked salmon could have capers in one, pickled red onion in another and maybe a nice herbed cream cheese with dill. The roast turkey could have a pesto mayonnaise, caramelized onions, chilled cranberry sauce, some chutney and maybe some of those caramelized onions. Do you see where I’m going with this?? It can be as easy or as intricate as you want. It’s elegant and it gives people choices. It’s a great way to please the guest because they get to choose what they want. It’s also a great conversation piece. Remember, people eat with their eyes first. If it looks good, the brain has already conversed with the belly and it’s going to taste great.

Sometime picking a theme can be fun. I had a friend who called me and asked me to match up some wonderful wines he purchased during a trip to Africa with the appetizers. I made a barbecued ostrich empanadas as one of the main appetizers. I have to tell you, it was the conversation piece of the party. No one had ever eaten ostrich and couldn’t believe it was even possible to get. Believe me, there are specialty shops where just about everything is possible. I’ve been doing this for a very long time and after many years, you learn the right people to contact even when it’s ostrich. By the way, empanadas are a cream cheese pastry dough similar to pie dough and all you do is roll the dough out and place your filling in the middle. Fold it over like a half-moon and seal. I’ll share with you the recipe for the dough a bit later. Send me a message asap if someone happens to ask you for ostrich empanadas this weekend. I hardly believe it’ll happen but I’m here for you if it does.

You can see that an appetizer social can be done quite simply. I call it a social because a party sounds like too much work. A social implies maybe some relaxing beverages and great conversation. A party is anxiety. It will show in your presentation. A social is relaxing. The host should never be too busy to be social. Preparation should be simple and easily executed.

If you have some appetizers you want to recommend, feel free to post them here with pictures! I’d love to see them and ofcourse share them with everyone.

For those interested, I’m available for socials. Feel free to contact me and I’ll take the stress away from you so you can relax and socialize.


20121027-214600.jpg


Leave a comment

You need that cake when??

One of the most common lines I’ve had to say repeatedly on the phone. Usually at 3pm, when the kitchen is cleaned and I was getting ready for the next day. Or finally getting a chance to sit with a customer and have a nice cup of well deserved tea. The phone would ring and on the other end, a frantic caller with the request,”Can I pick up a birthday cake in about an hour?? I hope you have what I want because this person is specific about what they like.”. Nice cup of tea just became the 7pm iced tea. With a deep breath, my reply would be that I don’t have that actual cake (or maybe I did by a stroke of luck) but I’ll make something that will work. The answer was never “no” but options. Hey, when you wait until the last-minute, options are better than no.

Important questions are: What’s the occasion, favorite colors, and flavors and the most important question absolutely ever: Are there any allergies. Once you have this information you can start your game plan. This is equivalent to overtime at the Superbowl. You have to think fast, work quick and deliver on time.

Cupcakes are a great way to make something quick and come as close to the requested flavor as you can. They can look very festive, decorative, simple or elegant and in a flash. Generally they take 15 to 18 minutes. While they are in the oven, prepare the frosting, icing or ganache (ga-NASH). so it’s ready to go once the bailout cakes are cooled. Put them in the freezer for a quick chill.

I always have ganache on hand, everyday all day. It’s your kitchen duct tape. It will fix everything. Here’s a nice recipe I’ll share:

1 cup of 1/2 and 1/2 and 1 cup of chocolate chips (semi sweet). That’s it! Place the 1/2 and 1/2 in a 4 cup microwave safe bowl. heat until just before the boiling point. Remove and add the chips. Let it sit for 5 minutes. Whisk together. When you first start to whisk, it looks like you’re getting no where but keep going. It’ll come together. This liquid gem is ready to use. Just dip the cupcakes in the ganache and let the excess drip off. Place on a plate and repeat until they’re all done. They will look decadent and shine. You will be the master chef of the day. Sometimes after they set, I’ll add a sugared violet or other flower. You can also frost the cupcake and then drizzle the ganache.

The sweet part about ganache is that’s the dipping stage when it’s first made. Let it sit at room temperature and it will solidify so you can use it as a frosting. Put it in the fridge and you can scoop it and make truffles. I’ve seen people dip bacon in it and sprinkle coarse salt on top. Keep it on hand and you’ll quickly realize why I call it sweet kitchen duct tape.

Gluten free friends, this applies to you too. Pipe some ganache in the middle and then put the top on and frost it. It’ll help make you a household name to gluten-free. Make sure the chocolate chips you are using are gluten-free of course.

So the next time you find out the night before that you’ve been nominated to make the main event for the next day’s festivities, try this option of making cupcakes.

School moms, make cupcakes and freeze them. Lots of them. Be ready. It’s going to happen. Frost them right from the freezer and by the next day they’re ready. Don’t panic. If you find out while you’re pouring that day’s orange juice you need a dozen asap, they’ll defrost by lunch time.

It’s a quick fix to a last-minute request. It works for any occasion too. You can do this and I’m here to help. If you have any questions, please feel free to ask them here. If you’re a cupcake officiando, post your work. I’d love to see it and so would everyone else. Bake on!


20121026-210515.jpg

20121026-210529.jpg


Leave a comment

Food is art.

I recently finished the move into my new home. If you have never moved before let me help you to visualize what it feels like. It’s what it feels like to stub your little toe on the leg of your bed. Then when you go to sit down to rub your toe, you hit your knee on the corner of the end table next to your bed. Something like that. That’s pretty close. With that said, the worst is over.

Now the best part begins. How to express yourself through your decor. As I mentioned in a previous post, I love to collect prints from various art museums. I have one in every room. Then I build everything else around that. It’s kind of like choosing the main dish and then building your salads, appetizers and sides around that. You want taste, color and the correct presentation. So when someone walks into your home, they look at your art and start to get a good idea of who you are and what you like.

Today I was thinking that my last home was far more modern than the one I’m in now. This home was built around the 1800’s and it’s charming to say the least. I love this place. My decor from the house just won’t fit right here. This is where being a pessimist pays off. I have some boxes I never unpacked from two moves ago. Yes, equivalent to stubbing your toe twice. When I opened these boxes, I found the most incredible pieces. I had completely forgotten about them. They were perfect!! As I kept digging I saw this poster cardboard container. I thought maybe it was something I bought for the bakery like a poster of biscotti or cannolis or something like that. I was wrong! It was a beautiful print from the New York Metropolitan Museum, one of my favorites. When I unraveled it, I was just amazed. I fell in love with it all over again. I also had the perfect frame sitting in the storeroom. I went out in a hurry and got the frame and in less than 5 minutes, it was framed and ready to hang. Not so fast. I really needed to sit and look at this for a moment. I’m sure my thoughts about it were different from when I first saw it.

As I looked at this picture I thought, did the artist think that someday a woman from Maine would be needing a painting like this to complete her decor? Doubt it. I’m sure he was having his usual artist day and just started to paint what he was feeling at that moment. He used what materials he had and his thoughts for the moment and created this beautiful picture. This is how I create recipes. Some days I see what I have for materials. Then I have a seat and think about what I’m feeling at that moment and I start to create. Once I’ve created a new recipe, I like to share it much like the prints I enjoy buying. However, with a recipe, you have to recreate what you’re reading. Through this process, you too become an artist because it’s your interpretation of the recipe that dictates how the end results will come out. With the artist, once finished, it becomes our interpretation of what we are looking at. This is why food is art.

An artist mixes and matches different colors and uses a brush or other tools to transfer that color onto the canvas or whatever surface they chose. A chef (kitchen artist) also mixes and matches different ingredients and then presents them when finished on a beautiful serving platter for everyone to enjoy. Like the picture, it needs to all come together. While decorating, I chose the print first and then the rest of the decor to work with it. In the kitchen, I chose a main course and salads, appetizers and dessert to go with it. Carefully balanced, your presentation is a work of art. People eat with their eyes first. If it looks good, it’s sure to taste good.

There are just so many correlations between the two. Make sure you really love the print first. If you bring home the one you’re really not crazy about and then match it with things you thought you might like but end up hating, it’s like stubbing your toe again. Bring home the right print and before you can have dinner on the table, your guests already know the meal and the company are going to be just as good.

Food is art.

20121025-203334.jpg


1 Comment

Bakers insurance that’s easy and affordable

Bakers have all types of tricks to our trade. You learn the basics from your mom, grandma (or pop) and just thoughtful people who like to teach. Some still use lard. Others use pure butter or a blend of some sort.These are used to coat the baking pan with a dusting of flour.  Everyone has their method.

Those of us in the food industry use a piece of kitchen equipment that is a multi tool: Parchment paper. Cue the music: “Alleluia”.

I love parchment paper. Now this might seem like a rather odd subject to post about but trust me, after you read it, you’ll understand why it’s the second most important tool in the kitchen besides your Kitchen Aid mixer. There are so many different ways to use it. The most common in the kitchen is with baking cakes and tea breads. It’s why I call it insurance. Your cakes will never have that annoying divot of missing cake on the bottom when you take it out of the pan. It will be neat, clean and ready to frost, virtually crumb free. Just place your pan on a piece of parchment paper and trace with a sharpie. Can’t find it? It’s in that junk drawer. Then cut just inside the circle. Spray your pan with non stick spray and place the circle on the bottom of the pan.Sometimes if I have enough paper, I’ll cut out a number of circles so they’re ready for the next cake. You can do the same for tea breads or any breads that would normally stick like cinnamon swirl or apple bread. Cut the rectangle circles out to fit the inside of the pan.

Another use is for making a paper cone so you can write on your cake or make drizzle marks on your cake or cupcakes. Just cut out a triangle and fold around to form a cone. I use a small piece of tape to secure it. I’ve been laughed at by fellow pastry chefs for using the tape but it was I who had the last laugh when they had a ganache blow out on the side. Ha!

A third and healthy use is with baking and steaming fish and vegetables. I love this method. Healthy, quick and very little if any cleanup. Cut out a circle about 12 inches. Fold the paper in half and then open it up and lay flat on a cookie sheet.Place your fish and vegetables in the center. Squeeze a little fresh lemon juice and add a few herbs (dill is nice with fish). Fold the paper over to make a half-moon and then tuck the seams under to seal. Bake at 350°. Depending on your fish I would haddock is pretty quick so a 6oz piece about 20 minutes. Salmon maybe about 30 to 35. Be careful when you open the bag because there will be quite a bit of steam. You’re going to love this method!! Just another insurance that your fish won’t stick to the paper.

Remember when you were a kid and you made snowflakes with paper?? You folded a circle in half and then in half again and again til you were dizzy. Then you cut shapes and opened it up to make a pretty (or really ugly!) snowflake. That same method can be used to make a stencil for the top of a simple cake. Spray on side of the parchment with non stick spray and lay that side down on the cake. Then dust the top with powdered sugar or cocoa. Carefully lift the paper off and what a beautiful design!!

There are so many ideas. I could go on all night. You can even wrap cookie dough logs in parchment and freeze them. I roll pie dough on this paper, cookie dough, my stained glass cookies and gluten-free pizza doughs…so many things. They will not stick. During the rolling out process you still need to flour the paper but it seriously will not stick.

There are a couple of ways to get parchment. At the grocery store which is the most expensive in my opinion. When I had my bakery, I used to sell it by the sheet to customers. Just go into a local bakery and ask if they have any parchment paper they can sell you. I was more than happy to help my customers. It was a great way to rest assured they would return but most important, if I gave them the right help to make it themselves, that’s a win in my book. What I can teach you, you can pass on to someone else. If we all work together, we can make this a baking nation again. Now I just put the words insurance and nation in the same post. That’s pretty risky. But I guarantee THIS insurance will work for everyone and is very affordable.


Leave a comment

Moving and the life lessons that come with it

It’s been about two weeks since I last wrote in my blog. I apologize. I was moving to a new location.

Now we all know the thrills and spills (and some pretty big spills) of moving. Finding the right location and choosing your new home (known as the thrills part). Then there’s the actual moving. It usually starts out harmless with packing a few boxes neatly and writing legibly on the box with the sharpie you found in the junk drawer. We all have a junk drawer. I bet there’s one battery and a sharpie in that drawer somewhere. Brand new tape gun and a fresh roll of box tape and I’m ready to go. Not so fast. By the 3rd box, the anxiety sets in.

When the anxiety starts to set in, it’s at this point you’re going to decided to get rid of everything…well maybe not everything…no…everything. Deep breath. You can do this. Now the cleansing begins. Do I need this? Do I need that? What is that and where did I get it? Suddenly you realize how you actually spend your money. That’s where reality takes its first positive turn. If I haven’t seen it in three months (or 7 years which was the case for most of this stuff), out it goes. That worked for the first ten minutes. Then I started to find a reason why at some point I’ll need that. If my daughter wasn’t there to redirect me, I would have reasoned with every piece. After a brief discussion, I made the choice to rent a dumpster. Not a small one either. A 10 yard dumpster was delivered that very morning. By evening, it was filled. Now we were on a roll…sort of.

The worst part about moving is opening another door and realizing you have your own retail store in the pantry. Here we go again. Now this was becoming a full fledged cleansing. I was giving things away and throwing things out. The pantry was becoming empty little by little. Each piece got heavier than the last. Time for a tag sale. The following weekend we had a tag sale and it went pretty well. The best part is having someone tell you how down on their luck they are and they want you to cut them this incredible deal. They want you to cut them a deal on stuff they’ll stick in their closet until they decide they too have to move. It’s then they hate you for giving them such a deal. Justice is served on the deal.

Did I mention I was moving a 3 bedroom ranch into a one bedroom apartment? Important piece. I had some real work ahead of me. My daughter and I worked everyday after work and on our days off. She was a real angel and worked into the evenings and her days off. We both knew what was ahead of us. Work during the day became the easy part. We decided to take a break and go to the apartment and see if we could envision where everything was going to go. My first reaction when I saw this place was “Thumblina lived here”. How was I going to do this? My place was built in the 1800’s and the mantles and wood trimmings (or moldings) are beautiful. It was a charming atmosphere and it has a beautiful fireplace. Every window has a sitting bench. We decided that my collection of prints from various Museums of art would be the perfect decor. I have beautiful prints from Boston, New York and Portland, Maine. Each room has a different picture. Now it was starting to come together. We knew exactly where everything was going to go.

When I returned with a load of boxes from the house, I saw a bottle of wine and a card by my door. The wine was red and called “Primal Roots”.That was an interesting name. I knew I was going to like this place. The card was a welcoming card from my new neighbor. With neighbors like this, it was already home. Gingerbread would be the perfect way to say hello to everyone.

Back to the move. Ugh. As the big stuff was out, it came down to the little things and the cabinets and that JUNK drawer. What is this stuff?? A caller ID from the 80’s? There’s that shoe lace! What could possibly be on this roll of film?? More wedding cakes?? Samuel Smith bottle opener? Now that’s not junk. I took a deep breath and threw the drawer contents out (except for the bottle opener). Having the dumpster dropped in a convenient location made for a great game of toss and hit the dumpster. You have to have some fun. And then you have to take time to reflect on what the lesson really is here.

My lesson in this move was material items don’t have the value I thought they once had. Hence the decision to let the house go to sale. Throwing out as much as we did and giving away brand new items to people I thought would appreciate it was much easier than I had ever hoped. I thought I needed to hang on to these items because someday I would need them. Someday. Well, in 7 years, someday hadn’t arrived. Out they went. I feel great! I feel like I’ve made plenty of room for the good energy to arrive. The energy in the new home is very good. My two cats have settled in very quickly. It’s nice of them to allow me to live here with them. They have showed me every nook and cranny in this place. Just look at the picture. Tell me they aren’t settled in.

The last box has been filled. I can’t believe it’s over. What a feeling! What an accomplishment. What an incredibly lucky mom I am to have a daughter who held me up through this process.

I had a great deal of support from a special friend that I truly appreciate. That friend who was so kind to share her beautiful parsley and Swiss chard from her personal garden. A very wise woman who knew the right thing to say and made perfect sense every time. Friends like this are very few and far between. To my dear friends who have the most interesting cat (aside from mine of course) and the perfect taste in jazz that certainly got me through the unpacking. I’m very thankful for the people in my life who did help and were there for us throughout this process. A move is when you realize who your friends really are.

A move is when you realize that you have learned the most important lesson in life. It’s not about the materials in life you acquire but the lessons about trust and love…and tossing out the caller ID from the 80’s.

20121021-215445.jpg

20121021-215516.jpg


Leave a comment

When creativity is rewarding

Wedding cakes are a perfect way to express your creativity. They are a sculpture that you create out of sugar. They are the center piece of the wedding reception. They are beautiful and elegant but never more than the bride herself. They are an expression of your creative side.

I started making wedding cakes about 20 years ago. The first one was for a customer of the restaurant I was working at. We had a very good reputation for desserts and so this customer decided that our cakes would become her wedding cake. Now let me tell something, you can make cakes all day everyday until the cows come home but when you get yourself involved in a wedding cake, you better know what you’re doing. So, I didn’t. I’m just putting it out there. Never volunteer. With that in mind, this bride knew exactly what she wanted. I think it was at that moment, I would never watch Martha Stewart again. This cake was all about Martha. What happened to the cakes we made here?? Even Martha would approve. Surely she should be told. Hardly. I soon learned the bride gets what the bride wants. It was a learning experience and one I would never forget.

I sat down with her and asked her what her “vision” was. She was all set with pictures. Great. She wanted this exact cake but with our cake flavors. I’m 1/2 way there I thought. It was the typical now fondant (which wasn’t typical then) cake with sugared flowers, extensive bead work and sugar lace. Did I mention this restaurant had a bar? The entire time she was talking I was thinking “Shaken not stirred, Shaken not stirred”. I had to do this. I knew somehow I could pull it off but this was no ordinary cake.  After the bride left and we had a decent deposit, the work began. Sketching the cake out and a lot of flower work was ahead of me. I had 6 months to sweat this one out. As the months went by, it seemed to be getting easier. I made so many flowers out of sugar I was going to offer them to FTD to sell. The wedding was now two days away. The flowers were done. The cakes were being baked. The fillings were being prepared. So far so good. The night before the cake was put together and placed in a cool room so it had time to set. All that means is the cake has time to settle so there are no surprises on the drive. Now let me tell you, the delivery of a wedding cake is more stressful than the initial meeting with the bride. I had 15 miles to drive in the summer in a tourist town. It was going to be a slow ride. With every cake, you must have a “crash” kit. This contains spare flowers, buttercream, pastry bags, spatulas and Advil. Since this was my first cake, I didn’t have the “crash” kit. I didn’t know better. It was the only cake I didn’t have one. Thanks to a fellow pastry chef who was there when I returned from my delivery. Best third degree talk I ever got.

The vehicle runs about 10 minutes with the air conditioner. I go into the kitchen and pick a victim for the ride with me. No one wanted any part of this so of course the new dishwasher is recruited. His only job is to hold the pan steady that the cake is resting on. I look over at my new partner on the way over and notice he isn’t breathing. This kid is scared to death. That was enough to relax me because I couldn’t let him see me sweat. So I told him,”It’s no big deal. You’re doing a great job”. He gives me deer in headlights eyes look and then takes a big breath. If he only knew what I was thinking at the same time. I was petrified.
We get the cake there and by the grace of the Good man, I didn’t need the crash kit. The cake was set up and I checked with the caterer to make sure it was to their expectations. When I got the nod, I couldn’t run out of there fast enough. The kid?? Right on my tails. After a big sigh and a few good laughs, he became my new cake co-pilot.

The beauty of these cakes is you can offer different flavors for each tier. I often do. If a bride and groom are at the initial meeting, I will ask them each what their favorite flavors are. Each tier becomes their favorite and then a neutral flavor is number three. If there is a budget constraint, no problem. I’ll offer a ceremonial cake that is two tiered and then a sheet cake in the kitchen for additional servings. Cupcakes are a great way to work with a budget and still be beautiful. Just add an 8″ ceremonial cake on the table so the couple has something to cut. I’ve made whoopie pie cakes with the color scheme as the fillings. I’ve made assorted pies for a Fall wedding and the most elegant French wedding cake: The Croquembouche. This is an amazing display of culinary talent. It’s cream puffs filled with a vanilla pastry cream and then dipped in very hot melted sugar and arranged in a cone shape. The remainder sugar is then quickly spun to make an angel hair to arrange around the display. Sometimes I add sugared violets. Weddings are as wide as the imagination will carry. No request has been too weird. Well, maybe a few have been a bit odd but not for the couple. I’ve also done gluten-free weddings which any one of these ideas can be made 100% gluten-free. Almost anything can be made into a wedding cake.

For me, after 20 years, wedding cakes have become somewhat easier to create. Even though every one is as different as the bride herself, they offer a challenge and just rewards when finished and delivered. There’s a great sense of satisfaction. It’s a sculpture. You are a sugar artist that has been hired to create this center piece.
Although experience helps to make the events leading up to the delivery more tolerable, the delivery itself has never gotten easier. It’s still white knuckled, no breathing and a quick dash out the door. And when you get out the door and back in your vehicle it’s then you realize that creativity is very rewarding.


This cake pictured is a gluten-free cake that I made for a beach wedding. The sea shells are hand-made and a use a little blue to pull through the white chocolate to tie in with the hydrangeas. The weird thing I was talking about? You can’t see it but the bride asked as a surprise if I would draw the symbol for Star Trek where they needed to cut the cake as a surprise for her groom.


Leave a comment

Spooky shortbreads

Yesterday I wrote about gingerbread houses and how they are not just for Christmas anymore. Today I wanted to share with you very simple ideas with shortbreads. If you are making gluten free cookies, these same rules apply. Remember, just because they are gluten free doesn’t mean you have to miss out on the fun.

The cookies in the picture are a plain shortbread that is filled and drizzled with semi sweet chocolate. I then added two little eyes for a “mummy” effect. You want to put the eyes in while the chocolate is still wet so they will stick. You can use any filling you want. You can even make these as a chocolate shortbread with a white chocolate drizzle. Raspberry jam with the chocolate drizzle and little eyes could look just as creepy and still taste great. The goal here isn’t just to make a scarey cookie. It’s to create a scarey cookie that looks, well, scarey but tastes really good.

The little eyes can be purchased online at the website: http://www.cakedeco.com. This is Pfeil and Holing and they will have just about every conceivable sugar decoration you could ever think of and ever need. While you’re on this website, check out some of the cookie cutters they have. The bone cutter is really cool. You can make a sandwich cookie with them and use the chocolate or raspberry filling. The top can get more chocolate or just dust it with confectionery sugar. When I had my bakery, we used to make them and call them “Good boy people treats”. The joke was if you got your husband to do anything on the “honey-do” list, then you could reward him with a bone. That’s a true story. It was funny at the time. We sold alot of them. I can tell you that!

The whole idea behind making fun food is you get the chance to be creative and give someone something you made that is actual special. Even mummy cookies can be special. Think outside the box! This is alittle off the cookie subject but those of you who know me know sometimes you really have to follow what I’m saying because I bounce from topic to topic and eventually come back to what we were talking about. Sorry but these wheels are constantly turning! Anyway, here’s a great little dessert for kids. It’s called “Worms in a bucket”. Now this is outside the box! Actaully it’s in a bucket. Usually at a dollar store you can find mini plastic sand buckets. Fill them 3/4 of the way with chocolate pudding. Use the instant kind. You’re not being graded on this assignment. Then take gummy worms and stick them half way in the pudding with some hanging over the edge. Use chocolate cookie crumbs and sprinkle quite a bit of them all over the top like dirt. If you have some shortbread bones, stick them in for fun too. Worms in a bucket!! You will be the coolest parent for sure! If you’re going to a big party, use a big bucket and watch people dive in. Did you see how I tied the shortbread into this?? See, I came back to the original subject.

The nice thing about making shortbreads is that they freeze really well. If you have a free day, make a batch and freeze them undecorated. Then they’re ready when you need them. Just pull them from the freezer and decorate. The fun part about making these cookies is they cut very clean from the cookie cutter so it’s an easy one for kids. Most shortbreads do not have raw egg so they can sneak some dough and you don’t have to worry about them getting sick. If you have an allergy to dairy, just substitutue Earth Balance for the butter. Don’t use margarine (yuck) because it has added water in it and it will show as bubbles in your shortbread. I use Cabot unsalted butter and I love it!

Visit cakedeco.com and after you “flip” through the pages, your wheels will start to turn too. Baking is fun and baking new cookies means starting new traditions. Every holiday brings new ideas. Halloween is a fun one because even if it gets messy, it’s Halloween. Break the rules!


Leave a comment

Gingerbread houses are not just for Christmas…

When you think of gingerbread houses, you think of Christmas and the snow capped roof, decorated trees and the festive feeling of the holidays. What about the rest of the year?? Gingerbread is not just for Christmas. It’s for any holiday or even just for fun.

You could even make a gingerbread house for a friend who has just bought a new house or camp. Wouldn’t it be fun to give them a house made to look like the one they just purchased?? No? Not so much? We’ll stick to the holidays for now but someday you’ll thank me for that little plug.

The house in this picture is a haunted gingerbread house made entirely out of edible pieces except for the base it stands on. The idea came to me while at my bakery I had a conversation with a customer who said she couldn’t wait for the holidays because she loved making cookies and candy houses. So I asked her why she was waiting for Christmas. Make them for now. I told her by the weekend I’ll have a haunted house and send her the pictures (she was from out-of-state).

So I started this house like I do all of the others, with a cardboard template. I built the initial model out of cake boards and put it together. Then the fun part begins. This is where your creativity side comes out. You have to think haunted and then think of food products to match. So I searched online for haunted houses and after about what seemed like a thousand but was only maybe 100, I had a good idea about what I wanted. Just staring at the pictures, I wanted trees with no leaves, ghosts, bats, pumpkins stained glass windows and broken shutters. Pastillage (pronounced: PA-stee-aj) is made from sugar and corn syrup. You roll it our like fondant or pie dough. It gets hard really fast so you have to work quick. With the help of a co-worker, we used this for most of the work other than the actual gingerbread. We used the rice Krispie treats to make the land and a base for the house. The trees were made from grape stems. Now some would argue that’s not edible but I would disagree. You can eat it. You just won’t enjoy it. It’s edible. Once the house is up, the decorating begins. Be creative. By the time we were done, we stood back and took a long look. It was fun and it was pretty awesome. It was a great piece for the customers to look at. The local paper came in and took pictures that was in the paper right before Halloween. It really drew quite a few customers which was really nice for us.

The best place to start is to draw your house out of cardboard and tape it together. Keep it small enough to work with. You’re not moving in. Cut out your windows and doorways. Then untape it and trace your dough around it. Bake the gingerbread and then let it cool at least over night but two days if you can. Let it sit out so it gets nice and dry. The best part about a haunted house is if you accidentally break a piece, ice it together. It’s a haunted house. It does not have to be perfect and you don’t want it to be. I always make two sets so I have backup ready. What I mean by that is I always have extra pieces because you never know when you’ll need them and you don’t want to wait two days for replacement parts.

To make the stained glass windows, just lay the gingerbread flat on a baking pan and place crushed life savers (like a powder) in the window and make sure the candy is touching all four sides of the window. Bake as usual. This is a great way to make stained glass cookies. Then once the window is baked and cooled, you can crack the window like a broken window. Let your mind have fun. Cool effects like these will make you a cool adult to the kids.

The best part for me was the more people who looked at this house, the more people I was hoping would take this idea and run with it. How many were going to go home and create a house of their own. How many kids were about to have a great time with an adult and learn about making these houses. How many of those children would grow up and someday make one with their own kids. See where this is going?? This is how I like to teach. If you plant an idea and make it easy to do, people will follow. This is how new traditions are created. If even one person tries this idea by reading this blog, one more child in the world just benefitted from quality time. And this all started over a simple conversation.

*Gluten free friends, you can make any gingerbread house you want as well. GF gingerbread dough works just as well. There’s no reason why you can’t be in on the fun too. Make the pastillage (no gluten there) and the icing (no gluten there either). Take a traditional recipe and substitute Gf all-purpose flour and xanthan gum.


1 Comment

A new beginning with painting

20120928-180810.jpg

There comes a time when you get a bit older that you rediscover yourself, at least I am. Last Spring there was an opportunity to take a painting lesson in Portland, Maine. I signed up but never schedules a date. Everytime I picked up the phone to call, I found another excuse not to go. Finally in September, I made the call. The instructor was very sweet and accommodating. I only have one day a week to complete all of my errands. We agreed on a date: September 28th. I had that date engraved in my mind. I was going to do the smaller paintings on my own. I had no idea what I was doing but it felt good to sit and paint what I thought would soon become wall decorations. Well, maybe for my office or over where the cat furniture is. It just wasn’t coming out the way I had hoped. Until today…

I arrived at my lesson and saw a table with two vases of flowers, a box and an apple on top of the box and a tea cup. It looked pretty but was that my project? Did I mistakenly tell her I WAS a painter? And she thinks I’m going to paint that? What have I gotten myself into now. So I took a deep breath and decided I was going to do this. I looked around at the painting she had around her portion of the studio and liked all of them. I knew at least I was with someone who knew what she was doing and was very good at it. It’s kind of like going to a restaurant and if the food looks good and tastes better, the chef knows what he’s doing.

First she had me sketch the scene out. She offered very helpful tips on how to do this. Good thing because I’m the daughter of an engineer and I make sharp corners and straight lines. Not so much with pencil sketching. She was a wonderful instructor. Then she had me sketch on a piece of canvas. I was nervous but another deep breath and I was on my way. Then the paints came out. This was like teaching a culinary class and handing someone a chefs knife and watching their knees buckle. She went through the colors and how to mix and work with different textures. Her techniques were simple to follow. By the end of class, the painting was done. She asked me to step back and take a look. It was amazing to me. I could see all of the tips she gave and the patience she displayed. It was on my tiny canvas and beautiful!

I quickly scheduled a second lesson in two weeks. I love food and I love art. Im not sure if she knew i loved tea and i work with food but her first still art lesson was right on. I’m guessing my painting will include some sort of food. Food is love and so is art.

As I discover who I am and what I really like, I’m learning to love who I actually am. It took me a long time to get here but it’s been worth the trip. I love to teach and I have spent most of my life being the instructor. Today I was the student. I’m now going to enjoy the rest of my days being that student. I love the new experiences life has to offer.


Leave a comment

Gingerbread on Broadway

The first semester of culinary school can be a bit nerving. You have to learn about new instructors, meet other students and prepare for your hands on lab classes. What you’re not quite prepared for is the invitation for 5 students to compete in a gingerbread contest in New York City on Broadway known as The Gingerbread on Broadway at the Marriott Marquis . It gets better. These are 5 students who have never baked a cookie, rolled a rolling-pin across a sheet of gingerbread let alone 120 sheets of gingerbread, used a commercial convection oven or a 30qt. Hobart mixer…until now. This gingerbread house had to be made entirely out of edible products. How hard can that be?? Read on…

The challenges come into play when the contest is first announced. Everyone wants to go. Now the weeding out process begins. This contest requires 40 hours of work which is after class 4 days a week. You have to participate in every class. There’s a lot of work that has to be done by everyone. One by one they filed out the door until there was 6 (one alternate). We’re building a team. I thought this was more of a challenge than building the house or transporting it 5 hours in a rented van.

Eventually we build a team and the work begins. For me, the most important condition was that who ever was in this, wanted to learn. They were willing to listen and try new techniques. This is all about learning. It’s a quick crash course on baking and decorating but more important, a course on trust and working together.

First order of business is what to build. They decided they were representing Maine and a lighthouse was the perfect way to do that. They chose the Nubble Lighthouse as a team. My insides were saying, “A light house? And it has to travel all the way to NYC down the Massachusetts Turnpike and through the streets of New York?? Don’t scare them. Keep this thought to yourself”. And so I did.

We start by building the house out of cardboard and constructing it together. This became our template. Then a quick course on mixing and rolling out dough. This was not so easy. Not a problem as this is where the learning continues. Then we had to decided how to stabilize the house. After staring at the picture of the Nubble for what seemed like hours but was only one hour, it was decided that the land would be made out of Rice Krispie treats and we could dig a foundation to sit the house in. Genius! I have learned that two of my team members work construction during the summer.As I learn the members, I learn their strengths. I have another person who loves to make beaded jewelery. She was perfect for the window work and trim. Each night was a new experience. There was excitement, tension and a lot of concentration. These would eventually be students in my baking and pastry class the next month. The house is constructed and now the creativity for the outside begins. We have a sugar made santa in a boat. This actually happens at the Nubble every year so that was important to include. We made lobster traps all out of sugar, a rocky shore and Christmas trees decorating the yard made with local candies. You can’t see them but behind the house are woodpiles made of pretzels and two cats playing in the snow. We used writing gel for the water. We used and made so much candy!!! It looked great!! I was so proud of my team.

Travel time! In all of my years making wedding cakes, I can tell you the delivery is the most painful. If it’s going to happen, it’s during the delivery. The entire night before, I prayed that every horrible driver  take the day off from work. We loaded the van and created a “crash” kit of extra gingerbread, candies, icing, pastry bags and Tylenol. After a long drive and solid white knuckles and a lot of laughs, we arrived.
We made it in one piece as did the house. However, we made the maximum size house allowed under the rules. No one told use we had to reserve a handicap room if we did that. The house wouldn’t fit in our room.I offered to sleep with it in the lobby but the staff said no. How out-of-place would I have looked sleeping in the lobby in New York? After a conference with the hotel staff, our house got its own suite, two floors a bar and a piano. We could not sleep in the suite but our gingerbread house would be safely locked in the room with a window view of Times Square.

After a sleepless night, we retrieved our gingerbread house and went to the conference room to set up. The room was decorated beautifully. There were 6 other schools there. We were the underdogs. I brought the students around to meet the other schools and to check out their work and make mental notes for next year. The judging began and consisted of culinary experts, architects and hotel staff. We walked away and sat in the next room chatting about the other incredible houses. My students were up against some pretty well known schools. I had complete faith in them because I watched them all grow in 6 short weeks. Once allowed back, the judges would come to your table and critique the work. This was a very important step for the students to experience. The awards were announced except for the People’s Choice which the public votes on and they have 3 weeks to do so while your house is displayed. Unfortunately we did not win the grand prize. I explained it was the People’s Choice award they wanted. It’s the award chosen by the public. Just three more weeks.  I told the students they were winners long before we arrived here. They learned to build a team, work together, be creative, learn several new skills and put together a beautiful gingerbread house. There wasn’t much I could say to make them feel better. It was a long ride home.

Three weeks later, we get the call from the Marriott. We won the People’s Choice award!! The students were thrilled!! The college was thrilled and the local news covered the story.

This was the most incredible 6 weeks I spent with brand new students. We all learned so many lessons including myself. We walked away with an award, new skills and most important, new friends.

Gingerbread houses don’t have to be this big. Start with a small house for little hands. Build a tradition with your kids or in the community. It builds strengths, courage, self-esteem and creates memories that will forever be remembered.